Monday 12 December 2011

Fantasy Olympics!


This project is using my skills in Adobe After Effects, Adobe Illustrator, Adobe Photoshop.  We had to create a character playing a futuristic sport for the Olympics.  I first chose the idea of having 5 different characters playing 5 different sports inside each of the rings of the Olympic logo but then stuck to one as this probably would not fit in a 30 second advert.  This animation was 2D and 3D mixed together. I decided to choose the sport boxing and the character of a Panda as this would stereo-typically win a fight of a smaller character.  At first I thought I would create some things in 3DS Max and the rest in After Effects. 


 I found that I first had trouble importing it as the textures would then not import with it therefore I had to recreate the textures in Photoshop and add them in, that way.  I found this way of texturing quite simple and easier once I had finally found out where to do it.


Once I had done this, I found that when importing the 3D object into After Effects, on the main composition, it would then convert it into a 2D object again but with perspective so that it looks 3D.  When you opened the object composition, it would become a 3D object so I think it was just a matter of placing it correctly in there for it to be right in the main composition therefore I left it and had decided to use 2D images of it and create it in that way because the use of transform allows you to perceive it as a 3D object when moving the planes around and connecting them.  I had used a bamboo forest for the environment as well as the design of the tree stumps and bamboo sticks for the boxing ring to give a sense of where an actual panda would live.


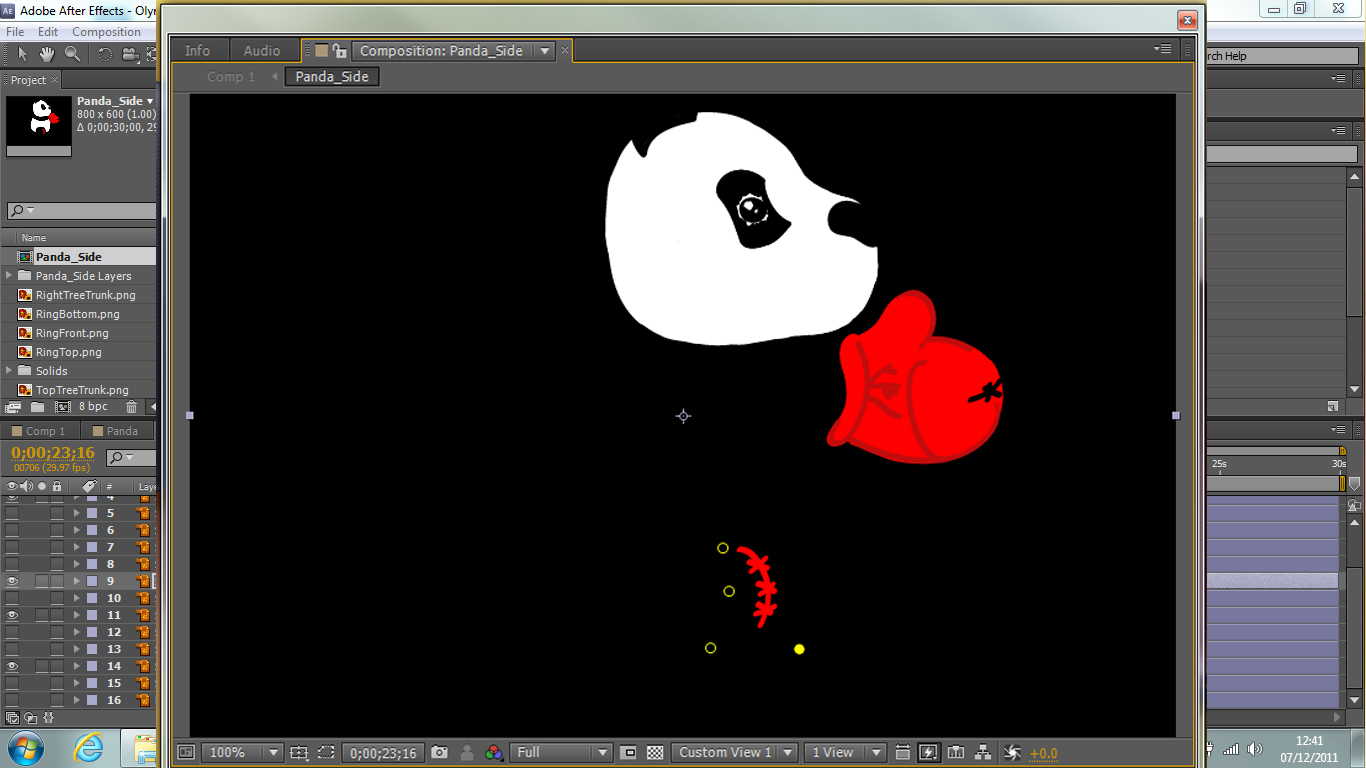
I had imported my 2D character into After Effects, I had created a front view and a side view of this so that I could use both in my main composition when needed.  To animate this, I had to use the Puppet Pin tool which allows you to deform the selected part so that it moves.  By having separate layers for each part of the Panda, it was easier to do this and none of the parts would move in unison without me wanting it too.  I had to do it in its own composition which then got imposed into the main composition.  I found this part easy to do. 


 My strengths for this project were creating the 2D elements for the whole animation, positioning them in the main composition and creating a sense of realism for the character using the puppet pins for the movement. I felt that I had created the environment very well and that it looked good by using both realistic images and cartoon images which I had created myself.  The boxing ring itself, I felt I had created well too after having a lot of problems with it.

My weaknesses were that I don’t think I tackled the “futuristic” element very well therefore could have improved by adjusting the sport itself so it would fit within the brief.  I think that I could have added another character into it so that the Panda would be fighting against another.

By doing this project, I am now able to create simple 2D cartoons and advertisements as well as idents.  A lot of animation work in Television and Film has the use of programs like Adobe After Effects in various forms such as the use of CGI or simply cartoon characters.  This means mixing the use of moving image and 3D animation into it too.


Saturday 19 November 2011

The Robotic Arm


From learning about inverse kinematics and being given a set robot arm to build (which mine got deleted), I have set about creating my own design.  I have added a glass texture to this and a theme for the characteristics for robot arm to have.  I have decided to give it female style attributes and characteristics as well as the good versus evil theme.  I have used the glass texture on the arms as I want to give it a sophisticated look and feel.  This is how far I have gone as to creating my robotic arm.  I have also storyboarded and designed it which I will scan in and load later.  In this part of the project, I have learnt Inverse Kinematics, Pivot Points, modelling and links/ hierarchies. 


The use of triangles in animation isn’t good therefore I have used all polygons that have more than three edges.  This means that the rendering and animations of the objects will be more sufficient.  


I have added a circular spline and made it into a shape so that the rotations can be in all directions.  A spline does not show in a render unless a modifier has been used in it which is useful to use.  This makes the wrist pivot point more operative and I can link all of the finger movements and wrist controllers onto this.  An IK Chain means that the movements of all of the parts of the arm can be linked and moved in unison with the correct angles. Once doing this, I did have trouble moving the translucent parts of the arms with the rest as they were not all one object even when linked therefore I had attached them all and given them all separate material values.  This meant that it would still look the same but operate to a better standard.


To ensure that the elbow has the correct movements, I have used a dummy which allows it to move in the right direction when linked.


Next I had created an eyeball in the palm of the hand using the same sort of features of a realistic eyeball.  It has a lens, pupil as a black hole and an iris.  The lens I had made translucent which shows that bit of a glint in it.  


I had then created the eyelids then used the morpher modifier to create different emotions and expressions which I incorporated into my animations to give it a bit of life.  The Mesh Smooth modifier gave it a finished look.


Next I had imported my chess board and pieces then started the animation.  I have the good vs evil theme in the pieces with the colours.  When animating the chess pieces, I had to use a link constraint which I found difficult to use as it was confusing linking it to the world and the hand.  After trying more than once, I had found that you have to do it in a certain order for it to work properly. When I wanted to link it to the world after the hand, it still did not do it properly as I had to use a keyframe for rotating before it had separated.  This had made the positioning of my chess pieces inaccurate. 


The curve editor was useful as it made the bounces of the rock and the chess pieces more accurate as you could simulate the curve to how an actual piece or rock would bounce or fall. 


I had then applied textures to it which made the whole thing more realistic.  A rock texture for the ground http://designm.ag/resources/free-stone-rock-textures/ and then the sky texture, I had added in After Effects in post production as it was easier to do and more practical.  I had used my own sky image that I had taken myself.   The light Omni Light has given the whole thing a focus point.


After watching the complete video, I felt that I could have improved the beginning establishing shot by making it slower; I could have used the camera in 3DS Max better and more smoothly.  I could have slowed the whole animation down generally so it was easier to see what was happening.  I could have used more camera angles and panning. I should have also rendered in Mental Ray so that the reflections on the chess table had shown.

I felt that my storyline to the video was good and the way I had edited it.  I liked the use of my environment and the way I had animated the robot arms with the expressions and movements.  The sound effects and music clip I had used proved to be effective.  (www.soundbible.com  http://www.youtube.com/watch?v=qqmWUNiD63M)

I had learnt a whole new range of techniques which I will be using in the future.


The Chess Board


For my main rigging project, we have to create a robotic arm that is playing chess.  So far I have created the chess pieces, the chess board and started the robotic arm.  For this project, so far I have used splines, lathing, modelling, inverse kinematics and more. 

While creating the horse, a theme became apparent to me.  The theme I have chosen is good versus evil.  With the evil side the colour scheme for the chess pieces will be black and red.  For example with this horse, it will have red glowing eyes.


For the good side, I will have the colour scheme of white/ beige and blue.  The horse piece for example, will blue glowing eyes.  The pieces have been created using splines and lathe but I still need to edit them to make the extra parts.  With my chess board, I have used a glass texture for the outside and for the main board, a tile effect.  I have added reflect for extra effect.


Friday 4 November 2011

Doctor's Bag


I modelled a doctor’s bag using the different viewports, the different angled images and a plane to start off with.  I then moved the vertices around accordingly to fit the shape of the image and then went onto extruding parts to fit the bag’s shape.  I also used the symmetry tool to ensure that I only had to model one quarter of the bag.  For the handle, I used a cylinder and modelled it to the shape.  I need to add a hole in it so that the torus’s can go through to match the bag’s shape.  I found this easy to model.


Goggles

The next object we modelled were a pair of goggles.  These used more features as well as the spline, such as extrude, general modelling and more.  I found these more difficult to model as they have a slightly more complicated shape to them. I have not yet modelled the strap but started on the extra parts.


Jug


For our visualisation project, we have been modelling several objects to give us practice into modelling objects realistically.  Our second object we have modelled is a jug.  We started off using a spline then eventually lathed the object and modelled it using editable poly.  We used different views of images of the jug, using different viewports to model it which made sure that the shape was correct.  We then created the handle which I struggled with as I wasn’t able to move any of it properly therefore I will have to think about creating the handle again.  The spout was created by moving vertices.


Orrery


To learn Kinematics and the art of movement in VE, we have been creating a solar system ready for our Chess Game project.  So far I have created the planets and done the schematics of it with a hierarchy.  This part was fairly easy but it was just a matter of finding the right buttons to make it right.  The next part I need to do is animate the solar system so that it all moves around correctly with the right values and using the curve editor.


Friday 7 October 2011


07/10/2011  18.47pm (23.17pm here)
(I’m in India and I can’t sleep. Dad’s snoring and it’s too hot!! Details you don’t really need to know.) Our first visualisation module is to create an exact replica, including the measurements of existing compositions with 6 items.  I have been practicing on a toy train.  I enjoyed creating this and had learnt some new techniques such as the chamfer tool and chamfer cylinder.  I modelled each block separately rather than using the extrude tool as this would then be easier for the next step which is texturing. An improvement I could make is to chamfer the abacus cylinders a bit more to give them a more rounder effect.


Tuesday 12 April 2011

Website Moodboard About Me!

Well it's quite self explanatory.  This is my moodboard about me to start me off with my website!

Monday 21 March 2011

Here are some images on set of the Darkroom scene.  We found that we had to reshoot this scene as it was grainy and the colour of the suit changed to purple. We did not have all the props needed to shoot this scene accurately the first time either therefore the second time we had shot it meant that it was more flowing and fit better with the script.


On the first day of filming, Jordan had organised the first location to be the Darkroom scene in 106a.  This was a good location to use as it was spacious and plenty of plugs to use for the lighting.  We only used one light to give a film noir feel as it had to light just one side of his face to show contours.  I had before hand looked at some Youtube video tutorials to gain a feel for this and to gain knowledge and techniques as this was the first time I had heard of the theme:

<iframe title="YouTube video player" width="640" height="390" src="http://www.youtube.com/embed/rzJbxCgEKdU" frameborder="0" allowfullscreen></iframe>

We had a practice run for the lighting before hand and here are some images from what we had gained: