This project was to create a character rig. First I had thought of two characters being a baby and a boy and then had written a beat script which allowed me to create a storyline around it:
Silent Comedy Beat Script
1. Boy and baby watch telly in a cardboard box;
2. The cartoon on the television is of a rocket in an asteroid belt;
3. Boy imagines that he is in the asteroid belt with baby so they start to pretend that the box is a spaceship;
4. They are avoiding the asteroids;
5. Meow!
6. A cat is strolling around the living room;
6. Baby becomes fascinated by this;
7. Giggle!
8. Baby attempts to come out of the box/ rocket;
9. Rocket wobbles and goes out of course in the imagination events;
10. Baby is determined to come out;
11. Baby walks to the other side of the box;
12. Boy realises baby is about to fall out and is scared
13. Baby slides out of the box
14. Crash!
15. Spaceship is toppled over and hits an asteroid;
16. Boy looks over with a frown;
17. Baby is over in front of the cat;
18. Giggle!
I felt that the beat script helped me a lot in shaping out my project. I designed the two characters. The character of the boy had been originally been designed by my friend then I changed it a bit so that it would work for the project and the theme. I had added a mouth, nose, hands and shoes.


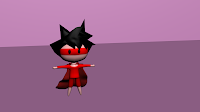


My second character I completely designed myself which was of a baby. I wanted to give this character a cute feel as I feel these work more successfully and can more of a feel of humour into it. I feel I should have made the eyes larger to achieve this even more.


Using Mudbox I feel was very useful if I wanted to change clothing styles. I decided to use this rather than use the material editor in 3ds as I could add a bit more detail onto it such as the nappy without having to edit the polygons too much.


After that, I modelled both characters in 3ds Max using a T-pose which is standard to be able to rig it to a good standard. This was the part I felt comfortable with doing as I had practiced this a bit over the Summer for a few other projects. I rigged the characters using CAT rigs and shaped the bones within my characters. I had to do this twice as I did not shape the bones accordingly the first time. This worked out well but when it came to editing the envelopes, I found this to be troublesome and judging from my final piece, I didn’t do it very well as there are parts of it that are still creasing wrong such as the shoulder of the boy towards the end when he falls over. I feel I may have had to edit them further during the animation process. I think there are other things that needed further research which make the bones attached to the muscle better as my arms and legs for my character are quite wide.


I started to animate the characters and create my storyline. I was comfortable doing this as I think some of the timings could have been smoother and I should have shortened the length between some of the actions to make it flow better. At certain points such as the blinking, I did these parts well.


Although the brief says to add only two characters, I also added a CAT rig to the cat as I needed something mobile to be a distraction for the baby. This didn’t at all look smooth even though I had mesh smoothed it and edited the envelopes. The envelopes on this for some reason were flat therefore did not cover the whole mesh properly. To make the cat mobile around the room rather than in a straight line, I had added a standard walk onto it and then I needed him to pause in two places and start moving again. I had to add both a standard CAT animation and a normal animation layer then play around with the Global Weights for both which allowed me to start and stop the rig. I had to do this for the baby too so that I could have two styles of action. I also added a path node onto the cat which is what allowed for the cat to walk around the room rather than in a straight line.
Both the baby and the cat have both CAT animation and normal animation layers as they needed it. The boy was mobile in the box and he was imaginary driving. I should have had him gripped onto a toy wheel to show that he can pick an object up. On the boy’s cape, I had used a wave modifier and attached it to one of the bones. I should have used the wave and moved the cape as a separate element to make it more fine-cut and so that it did not go through his arm or the box. The wave itself worked well by making it look like it was flowing.
My environment I created was all parts of my old pieces of work. I had just imported them and used some of my own textures I had taken and quickly applied them which allowed me to spend less time on the environment but still make it work successfully. I used After Effects and Illustrator to create the outdoor scene and the space/ alien part by using the skills I have used previously.


In conclusion, I feel that I need a lot more practice with character rigging and I think it will be useful for me to know as the gaming industry and film industry use this a lot and having skills in all areas to a good enough level is probably required in industry in case you have to change what you’re doing. I would fine tooth the actions and sort out the envelopes to a better degree. Some of the positions of things I would have also fine toothed such as the cape, the baby and the boy all in the box. The parts I did achieve successfully in this project were modelling the characters, rigging the baby, creating a good flowing storyline, the path node, the morphing of the baby and the boy and applying sound effects in the right places.


No comments:
Post a Comment