Sunday, 22 January 2012

My Visualisation Project!


 My visualisation project is about still life.  My theme for this project is menswear but I added a narrative to this to ensure that my theme was understood.  The narrative is a business man coming home from work where he places his items after removing them and is enjoying a glass of wine.  I have selected 6 objects to model which are: cufflinks, a tie, a watch, a pair of glasses and a glass of wine and a pen.  With this, I have chosen four sceneries where this narrative could work with an extension in some cases.  The first scenery I have chosen is the table in the living room where the man would place his things.  The next is the bathroom where he could be getting getting ready to relax after a hard day of work and the next is on the sofa being careless and homely where the glass of wine could fall.  The last I have chosen is the bedroom side table where he places his objects just before heading to sleep. 

Next I thought about the composition of these items.  I chose to use the composition of Gerrit Willemsz Heda from his painting of Still Life with a Nautilus Cup from [1645].  This was ideal because of the wine glass that I had chosen to model. I kept the same sort of positioning of items and the angles which means that it corresponds with the style of Heda.  The tie I draped over like the cloth, the angles of the rest of the objects, the positioning of the wine glass and the glasses and watch being slightly off the table.


I found modelling the objects easy as I could measure them and look at them physically.  The texturing to some aspect was easy if the materials didn't need to hold reflections of the environment.  With these I could use my own textures that I had taken instead of the pre-made default ones.  For the cufflinks and tie, I had used the same texture for the material but I photographed them from the box that they came in as the cufflinks were too small.  The watch had taken the longest to model and texture as this has more intricate detail and I had used the UVW Unwrap tool to create the leather straps to make them look right.


I found the sofa hard to model and texture for one of the environments as I had to use the UVW Unwrap tool again to texture it.  This object has more shapes to it which and when I tried to apply any  of the smoothing filters on this, the texturing would shift and not look correct therefore I applied a black background instead of a white one so that it blended in more.


I found lighting the scenery simple to do by changing the colours to the mood and colours that would be there such as a slight blue-ish colour for the bathroom scenery.  I had these environments infront of me to look at which helped a great deal.  The living room table had a window, sunshine lighting feel to it becoming evening whereas the sofa living room environment had an evening spotlight feel.  The bathroom had a blue-ish top spotlight feel and the bedroom had a three directional bulb lighting.


I would improve the modelling of a few of the objects as well as in the environment and use my own metal textures if I did the project again.  I would perhaps work more on some of the shadows from the lighting too as some of them showed to have some jagged edges.  I feel that this project has helped me immensly as I can now model and texture quite accurately which is used as a basis for nearly all virtual environment careers whether it is realistic or unrealistic.


Here is my flikr account with some textures as well as some of the ones I have used.  I couldn't load them all as I used my monthly allowance.  I have organised my photographs into sets.


Monday, 12 December 2011

Fantasy Olympics!


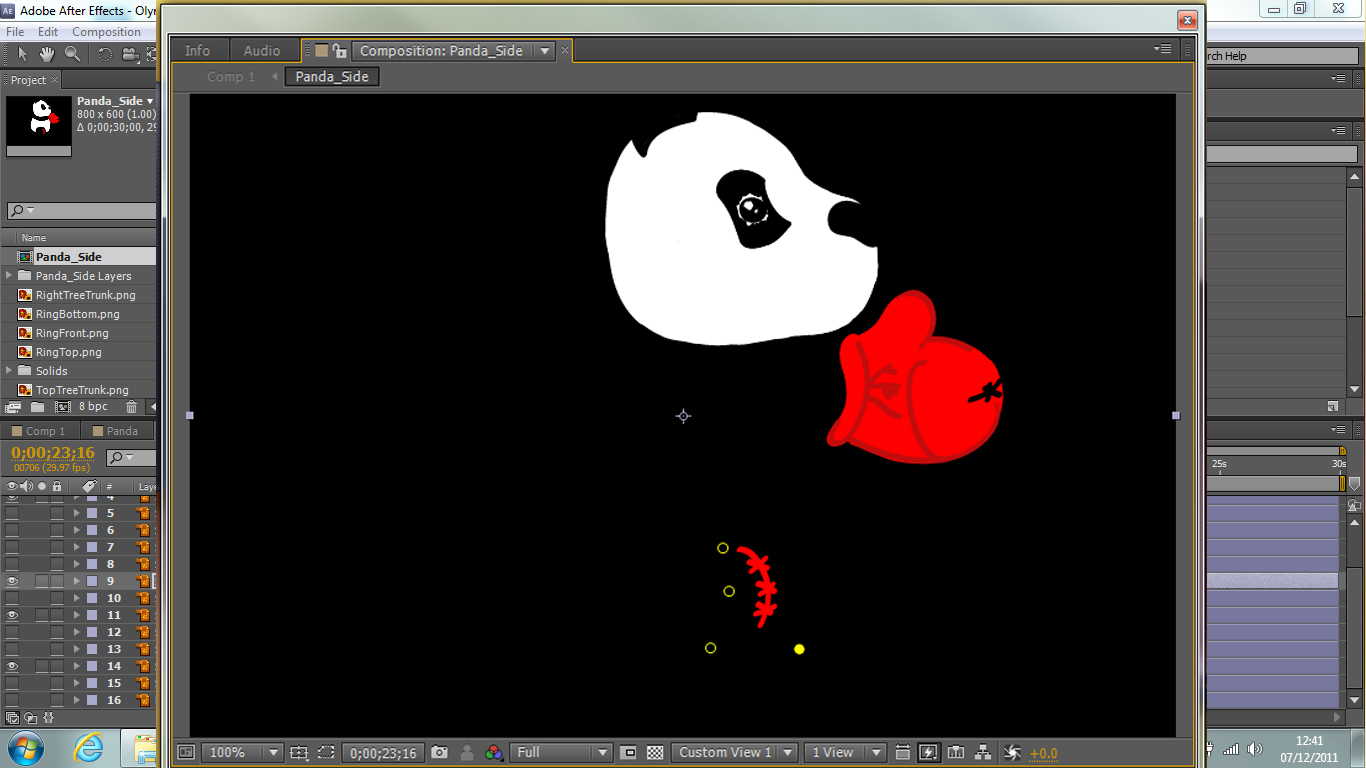
This project is using my skills in Adobe After Effects, Adobe Illustrator, Adobe Photoshop.  We had to create a character playing a futuristic sport for the Olympics.  I first chose the idea of having 5 different characters playing 5 different sports inside each of the rings of the Olympic logo but then stuck to one as this probably would not fit in a 30 second advert.  This animation was 2D and 3D mixed together. I decided to choose the sport boxing and the character of a Panda as this would stereo-typically win a fight of a smaller character.  At first I thought I would create some things in 3DS Max and the rest in After Effects. 


 I found that I first had trouble importing it as the textures would then not import with it therefore I had to recreate the textures in Photoshop and add them in, that way.  I found this way of texturing quite simple and easier once I had finally found out where to do it.


Once I had done this, I found that when importing the 3D object into After Effects, on the main composition, it would then convert it into a 2D object again but with perspective so that it looks 3D.  When you opened the object composition, it would become a 3D object so I think it was just a matter of placing it correctly in there for it to be right in the main composition therefore I left it and had decided to use 2D images of it and create it in that way because the use of transform allows you to perceive it as a 3D object when moving the planes around and connecting them.  I had used a bamboo forest for the environment as well as the design of the tree stumps and bamboo sticks for the boxing ring to give a sense of where an actual panda would live.


I had imported my 2D character into After Effects, I had created a front view and a side view of this so that I could use both in my main composition when needed.  To animate this, I had to use the Puppet Pin tool which allows you to deform the selected part so that it moves.  By having separate layers for each part of the Panda, it was easier to do this and none of the parts would move in unison without me wanting it too.  I had to do it in its own composition which then got imposed into the main composition.  I found this part easy to do. 


 My strengths for this project were creating the 2D elements for the whole animation, positioning them in the main composition and creating a sense of realism for the character using the puppet pins for the movement. I felt that I had created the environment very well and that it looked good by using both realistic images and cartoon images which I had created myself.  The boxing ring itself, I felt I had created well too after having a lot of problems with it.

My weaknesses were that I don’t think I tackled the “futuristic” element very well therefore could have improved by adjusting the sport itself so it would fit within the brief.  I think that I could have added another character into it so that the Panda would be fighting against another.

By doing this project, I am now able to create simple 2D cartoons and advertisements as well as idents.  A lot of animation work in Television and Film has the use of programs like Adobe After Effects in various forms such as the use of CGI or simply cartoon characters.  This means mixing the use of moving image and 3D animation into it too.


Saturday, 19 November 2011

The Robotic Arm


From learning about inverse kinematics and being given a set robot arm to build (which mine got deleted), I have set about creating my own design.  I have added a glass texture to this and a theme for the characteristics for robot arm to have.  I have decided to give it female style attributes and characteristics as well as the good versus evil theme.  I have used the glass texture on the arms as I want to give it a sophisticated look and feel.  This is how far I have gone as to creating my robotic arm.  I have also storyboarded and designed it which I will scan in and load later.  In this part of the project, I have learnt Inverse Kinematics, Pivot Points, modelling and links/ hierarchies. 


The use of triangles in animation isn’t good therefore I have used all polygons that have more than three edges.  This means that the rendering and animations of the objects will be more sufficient.  


I have added a circular spline and made it into a shape so that the rotations can be in all directions.  A spline does not show in a render unless a modifier has been used in it which is useful to use.  This makes the wrist pivot point more operative and I can link all of the finger movements and wrist controllers onto this.  An IK Chain means that the movements of all of the parts of the arm can be linked and moved in unison with the correct angles. Once doing this, I did have trouble moving the translucent parts of the arms with the rest as they were not all one object even when linked therefore I had attached them all and given them all separate material values.  This meant that it would still look the same but operate to a better standard.


To ensure that the elbow has the correct movements, I have used a dummy which allows it to move in the right direction when linked.


Next I had created an eyeball in the palm of the hand using the same sort of features of a realistic eyeball.  It has a lens, pupil as a black hole and an iris.  The lens I had made translucent which shows that bit of a glint in it.  


I had then created the eyelids then used the morpher modifier to create different emotions and expressions which I incorporated into my animations to give it a bit of life.  The Mesh Smooth modifier gave it a finished look.


Next I had imported my chess board and pieces then started the animation.  I have the good vs evil theme in the pieces with the colours.  When animating the chess pieces, I had to use a link constraint which I found difficult to use as it was confusing linking it to the world and the hand.  After trying more than once, I had found that you have to do it in a certain order for it to work properly. When I wanted to link it to the world after the hand, it still did not do it properly as I had to use a keyframe for rotating before it had separated.  This had made the positioning of my chess pieces inaccurate. 


The curve editor was useful as it made the bounces of the rock and the chess pieces more accurate as you could simulate the curve to how an actual piece or rock would bounce or fall. 


I had then applied textures to it which made the whole thing more realistic.  A rock texture for the ground http://designm.ag/resources/free-stone-rock-textures/ and then the sky texture, I had added in After Effects in post production as it was easier to do and more practical.  I had used my own sky image that I had taken myself.   The light Omni Light has given the whole thing a focus point.


After watching the complete video, I felt that I could have improved the beginning establishing shot by making it slower; I could have used the camera in 3DS Max better and more smoothly.  I could have slowed the whole animation down generally so it was easier to see what was happening.  I could have used more camera angles and panning. I should have also rendered in Mental Ray so that the reflections on the chess table had shown.

I felt that my storyline to the video was good and the way I had edited it.  I liked the use of my environment and the way I had animated the robot arms with the expressions and movements.  The sound effects and music clip I had used proved to be effective.  (www.soundbible.com  http://www.youtube.com/watch?v=qqmWUNiD63M)

I had learnt a whole new range of techniques which I will be using in the future.